
Top 5 Bodyweight Core Exercises
Planks, situps, crunches. You’ve probably heard of these core exercises. But, what exactly is your core? Well, your core muscles are located in your abdomen, lower back, pelvis, and hips. These muscles have specific functions such as helping you breathe and continence. Training your core leads to a range of benefits like increased balance, posture, and leaner-looking muscles. There are plenty of bodyweight core exercises out there to try. Whether you’re a newbie to working out or a gym pro, these top 5 bodyweight core exercises are bound to tickle your fancy. And what’s even better? You only need your body weight. No need for equipment or a gym!
1. The Plank
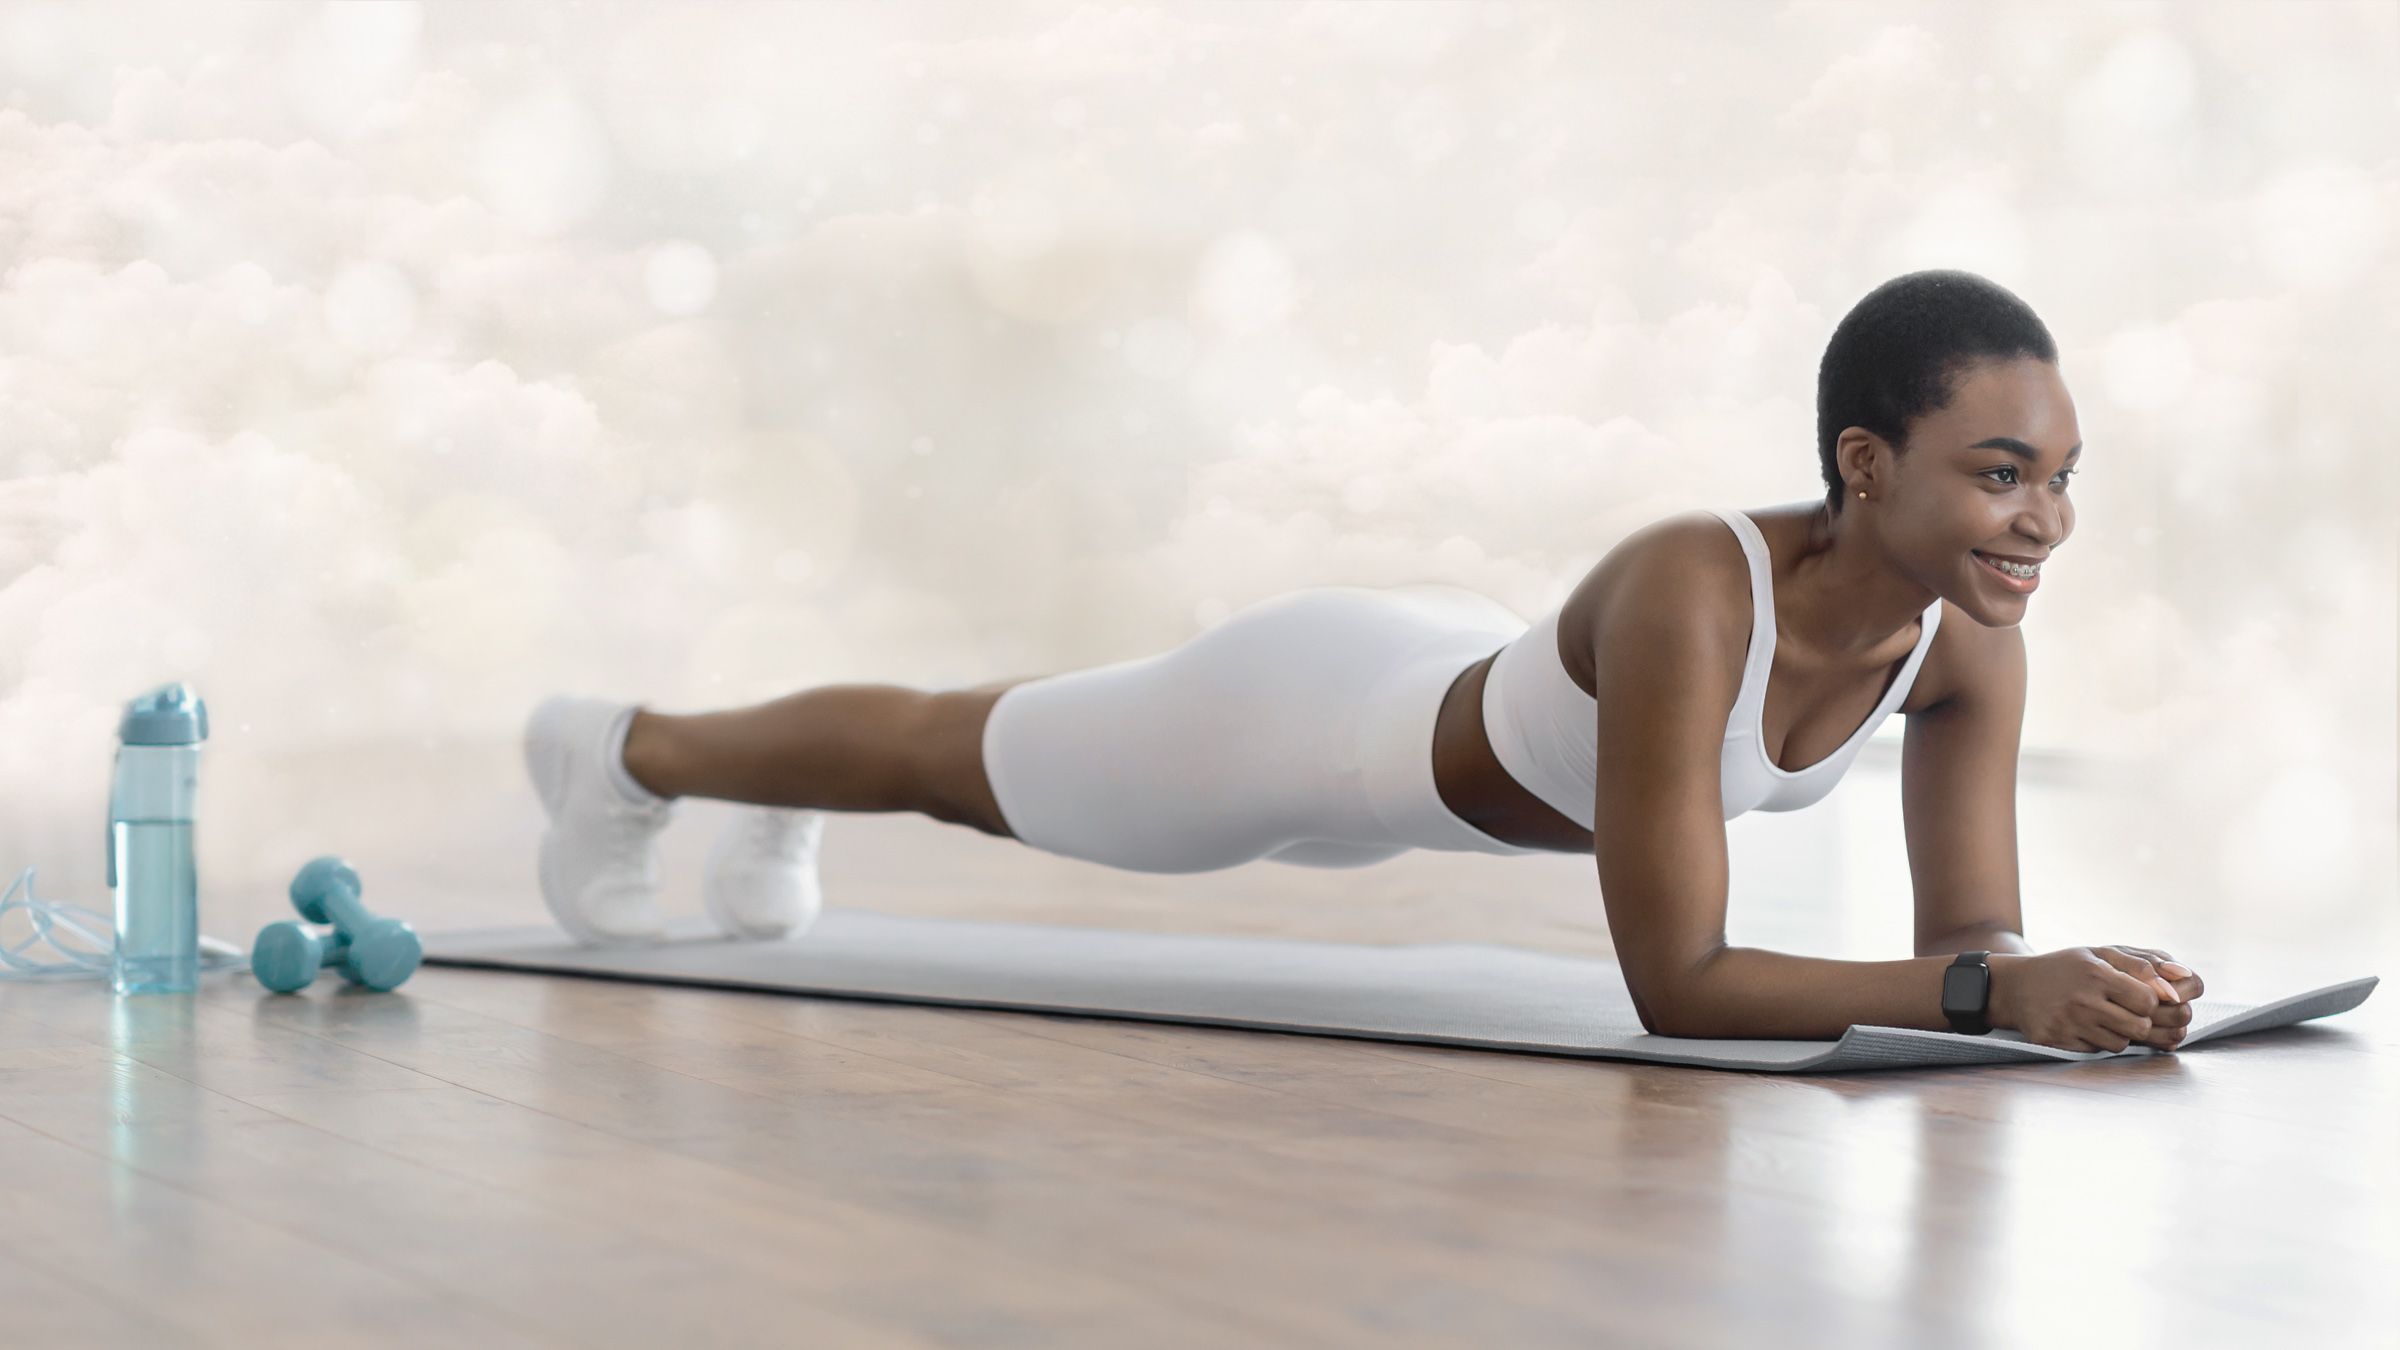
You’ve probably heard of a plank. It is an excellent core exercise which is why it’s number one on the list. Add planks to your ab workout routine to fire up your core.
Targets: core muscles
Level: beginner
The benefits of planks include:
● activating your core muscles and your arms and legs, making it a full-body burner;
● improving your posture by developing your isometric strength;
● increasing the flexibility of your lower body by giving your hamstrings a good stretch;
● putting less to no strain on your back and neck, which can happen during crunches and situps;
● toning your abdominal muscles for a flatter stomach;
● and finally, planks are super easy to modify, meaning you can cater them to your specific needs.
How to do a plank
- Make sure you have the space to extend horizontally. Use a mat to provide padding for your palms or forearms.
- Place your hands directly under your shoulders, a little wider than shoulder width. As if you’re about to do a push-up.
- Push your toes into the floor and squeeze your glutes (the muscles in your butt). This will keep your balance.
- Keep your neck and spine straight and in one line. Do this by focusing on one spot in front of you. Your head should be in line with your back.
- Hold for twenty seconds. As time goes on you can hold a plank for as long as you wish. As long as it doesn’t compromise your breath.
Variations: you can plank on either your palms or forearms and your toes or knees. If at any point your form starts to suffer, drop to your knees or forearms for a few seconds. Then return to the full plank.
Common mistakes
● Collapsing your lower back: you shouldn’t dip your butt or lower back. To prevent this, engage your core. Imagine you’re pulling your belly button in towards your spine.
● Sticking your butt up: your butt and back should be in line. Keep your butt flat, but you shouldn’t let it dip too much either.
● Letting your head drop: don’t forget about your head and neck, they play a vital part in this exercise as well. Focus on a spot on the floor to keep your neck in a neutral position.
● Forgetting to breathe: it’s normal to hold your breath while firing up your core. But try to avoid this. Holding your breath can make you feel sick and dizzy.
Planking can be tricky in the beginning, but practice sure makes perfect. Remember to focus on your form and breathe. And try to ignore your timer. You’ll get there in the end!
2. Sit-ups

Next on our list are sit-ups. You’ve without a doubt heard of this exercise and have probably even tried one at some point. But if not, don’t fear, we’ll talk you through it.
Targets: core muscles as well as hip flexors, chest, and neck.
Level: beginner
The benefits of sit-ups include:
● strengthening your core which reduces your risk of back pain;
● practicing diaphragmatic breathing. Sit-ups compress your abdomen, which positively affects your diaphragm;
● improving your balance and coordination;
● burning calories as they activate different muscles at once;
● increasing your flexibility;
● improving your posture;
● building muscle mass in your abdomen;
● toning your stomach for a flatter appearance;
● and finally, there are plenty of moderations to choose from.
How to do a sit-up
- Lie flat on your back on a yoga mat. Bend your knees and push your feet into the ground.
- Tuck your chin into your chest.
- Place each hand on either side of your ear, slightly towards the back of your head.
- Slowly, curl your upper body up towards your thighs. Exhale as you lift.
- Inhale as you slowly return to the ground.
- Aim to do between twelve and fifteen reps for three rounds. As you become more comfortable, add more reps and rounds.
Variations: you can play around with the position of your hands, such as stretched out towards your knees or by your chest. You could even try a butterfly sit-up. Bend your legs but touch the soles of your feet together, allowing your knees to sink to each side.
Common mistakes
● Lifting from your neck: this is the most common mistake. Not only does it do nothing for your core. But, it also puts a huge strain on your neck and can result in injury. Use your abdominal muscles to lift up and not your neck.
● Using your hands to lift: again, this can result in neck injury. Your hands are only there to support your head, not to lift you up.
● Going up too fast: this can cause injury. Lift up and back down slowly to really get your core working.
● Wobbly legs: anchor your feet into the ground to prevent any rocking during the exercise.
Sit-ups are fairly simple once you get the hang of them. They’re super easy to add to any workout routine. Plus with plenty of variations, you’ll never get bored!
3. Leg Raises
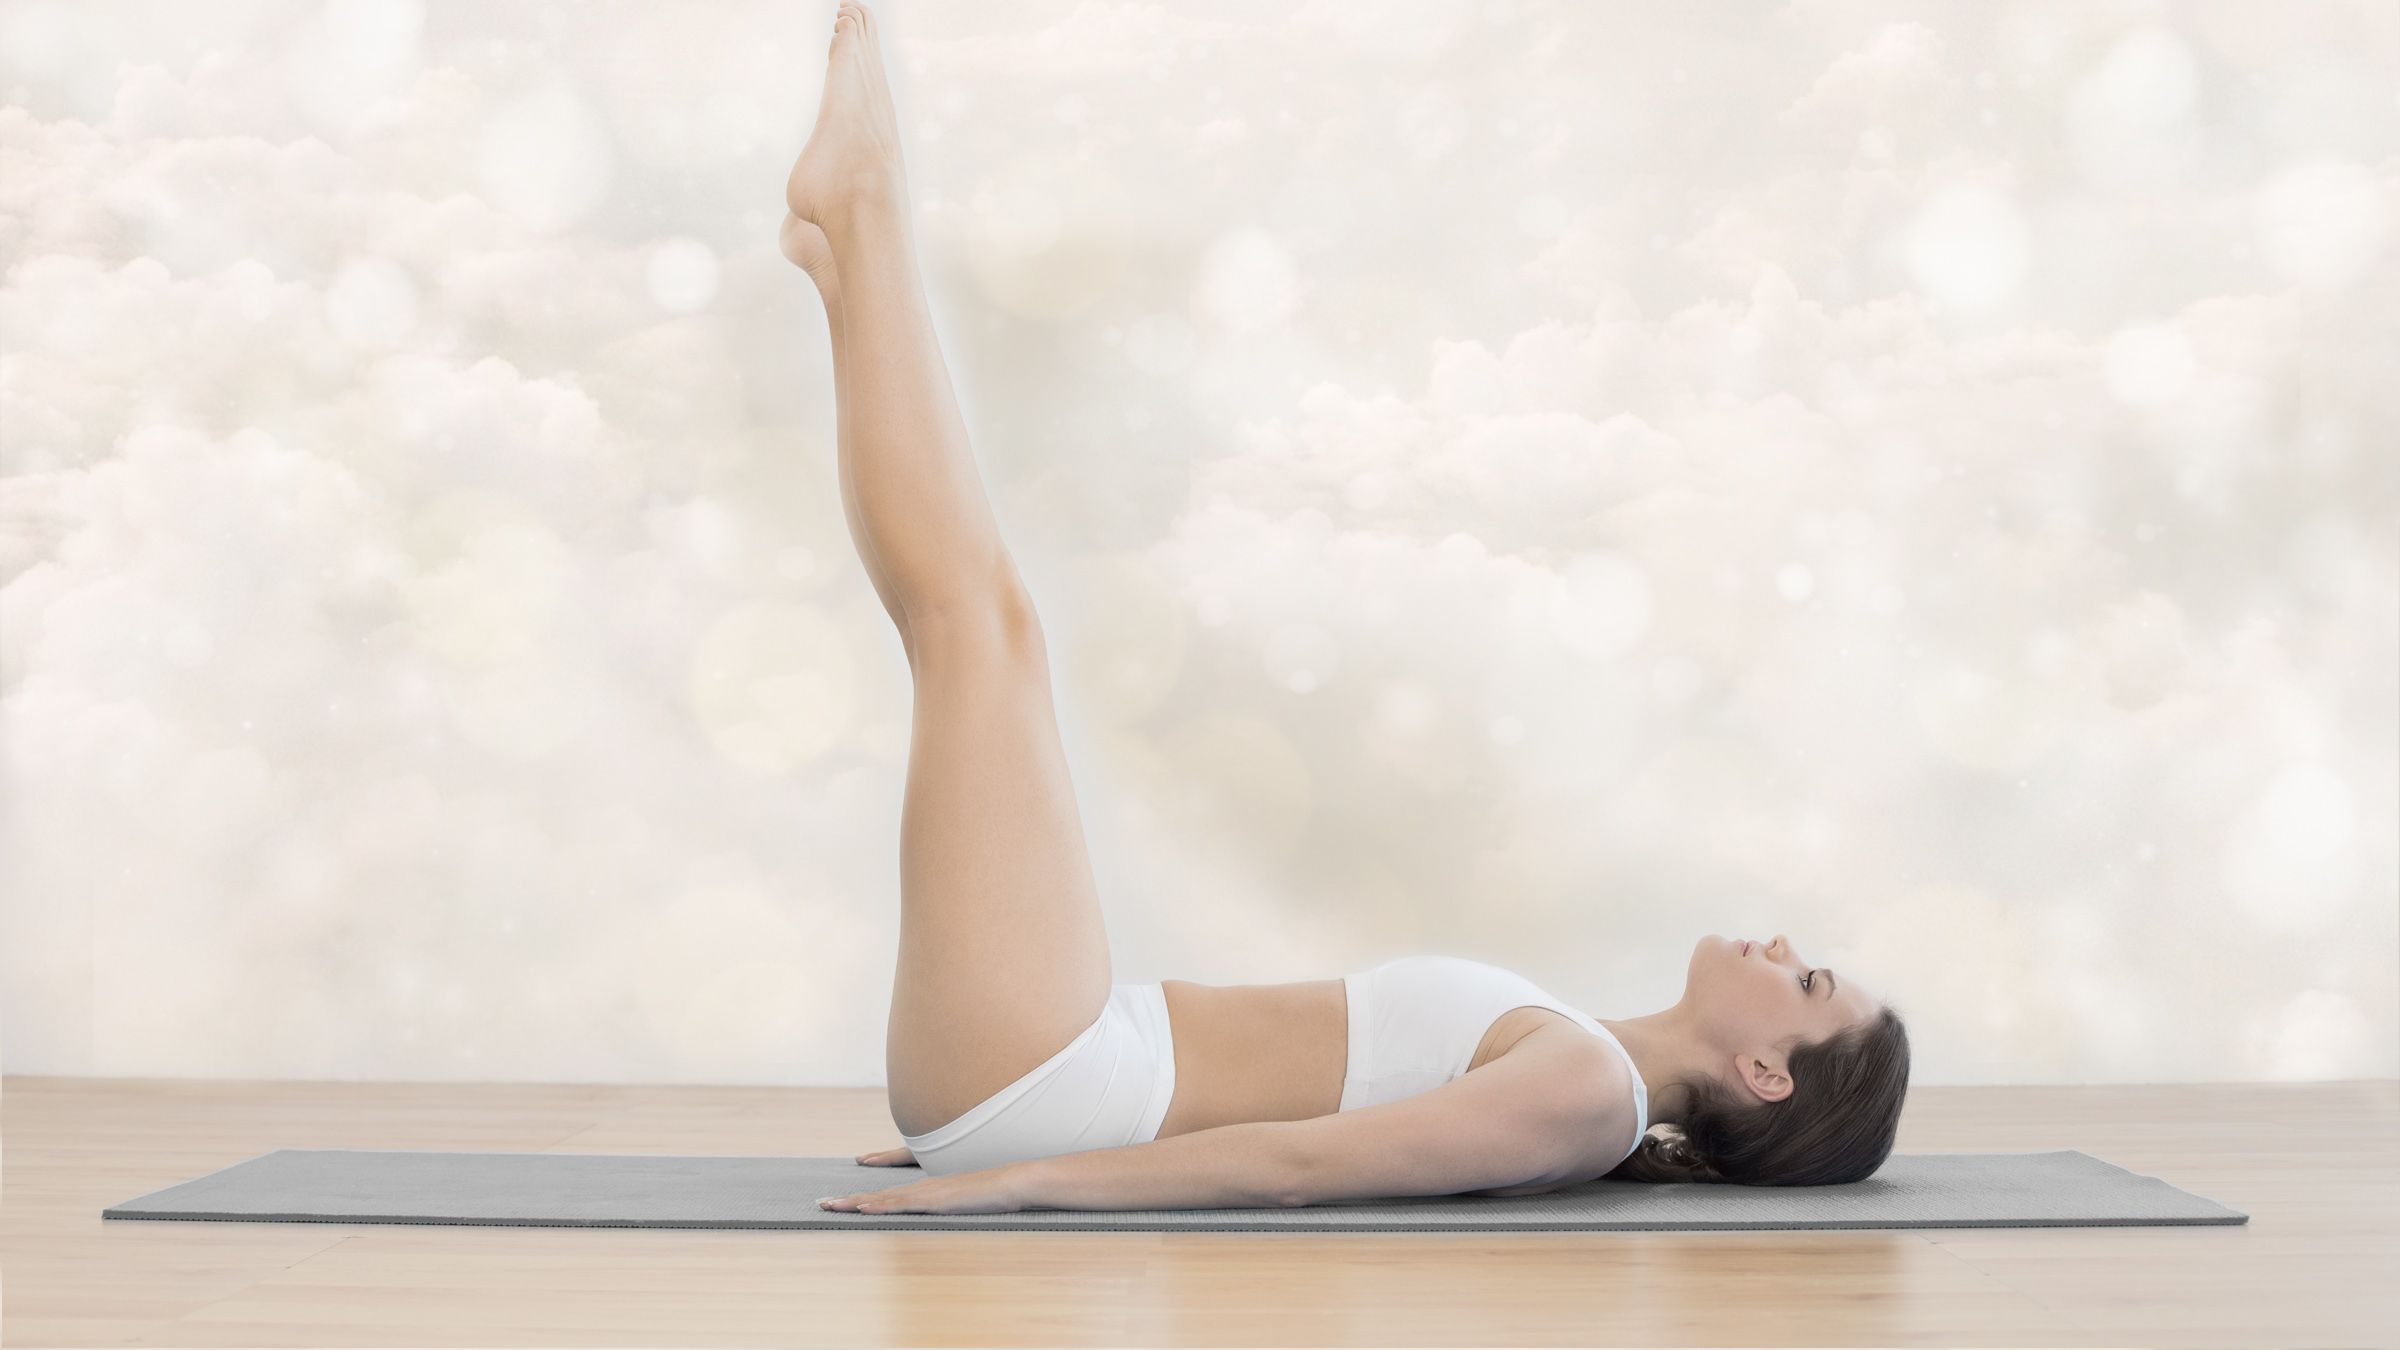
Ah, leg raises, another classic. This exercise is simple yet effective. So, be sure to add them to your ab routine. Your core will certainly be grateful!
Targets: core muscles, hip flexors, hamstrings, and quads.
Level: beginner
The benefits of leg raises include:
● strengthening your core;
● strengthening your glutes and leg muscles;
● helping with weight loss;
● stabilizing your core;
● preventing back pain;
● toning your stomach for a flatter appearance;
● and finally, leg raises are an absolute killer lower-ab workout.
How to do a leg raise
- Lie on your back on a yoga mat with your legs extended. Place your hands underneath your lower back and glutes to support your pelvis.
- Slowly raise your legs to the ceiling. Push your thighs together. Go as far as you can with straight legs.
- Slowly lower back down and repeat.
- Aim to do twelve to thirteen reps for three rounds with a pause in between. As you become more comfortable with the exercise, you can do more reps and rounds.
Variations: if you’re a beginner, start by doing leg raises with slightly bent legs. If you want more of a challenge, don’t allow your legs to touch the ground at the end of the move. This will really fire up your lower abs.
Common mistakes
● Arching your back: make sure your back is flat on the ground. Otherwise, you’ll just be working your hip flexors and not your abs. Before starting, swing your legs and lower back towards your head and then back down. This will ensure your back is flat.
● Moving too fast: lift up and down again slowly to really get your muscles working.
● Dropping your legs: avoid allowing your legs to fall. Instead, slowly bring them down with control.
● Lifting your neck: keep your neck firmly on the ground. Lifting or flexing it can cause strain and injury and you don’t want that.
Leg raises are a simple yet extremely effective bodyweight core exercise. Be sure to make them an integral part of your routine. You’ll feel and see the difference in no time!
4. Russian Twists

Number four on our list are Russian twists. These are an absolute burner to get your side abdominal muscles fired up.
Targets: core muscles, especially your side abdominals known as obliques. Also your spine.
Level: beginner
The benefits of Russian twists include:
● strengthening your core;
● improving your posture;
● improving your balance;
● building stability in your spine;
● burning calories;
● targeting your obliques;
● cinching in your waistline;
● and, finally, Russian twists help tone stubborn belly fat.
How to do a Russian twist
- Sit on a yoga mat with your legs in front of you. Bend your knees and lift your legs, crossing your ankles.
- Lean back slightly, so your torso and legs make a V-shape.
- Squeeze your core muscles to balance in the position, keeping your legs up.
- Now, twist your torso from side to side, without moving your legs. Place your hands together and tap on either side as you twist.
- Aim to do this for three sets of thirty seconds. As you become more comfortable with the position, you can do longer reps.
Variations: If you’re struggling, drop your toes to the ground for support. If you want more of a challenge, uncross your ankles and lean slightly more back to keep your legs together. This will engage your core even more.
Common mistakes
● Holding your breath: remember to breathe. You don’t want to become dizzy.
● Moving too fast: move slowly from side to side to really engage your core.
● Arching your lower back: is the result of fatigue. Engage your abdominals by pulling your belly button into your spine.
● Twisting your lower back: remember this is a core exercise. Focus on moving your upper body and arms to combat this.
● Leaning too far back: this can cause back injury. Keep your knees bent to maintain that all-important V-shape.
So, there you have it, the Russian twist. This quick and simple exercise will leave your obliques burning and give you the results you want in no time.
5. The Stomach Vacuum
Finally on our list, we have vacuums. No, we aren’t talking about housework! Stomach vacuums are a less heard of exercise. But that doesn’t stop them from being extremely effective! They were popular in bodybuilding in the 1970s and 1980s and made famous by the likes of Arnold Schwarzenegger. But, what exactly is a stomach vacuum? Well, vacuuming is a breathing exercise that strengthens your deepest abdominal muscles. It’s done by squeezing the muscles, rather than flexing them.
Targets: the transversus abdominis, which is the deepest abdominal muscle. It sits beneath your obliques and spans from your ribcage to your pelvis. As you can imagine, these are the most difficult core muscles to activate.
Level: beginner
The benefits of stomach vacuums include:
● increasing your core strength;
● activating your deeper abdominal muscles,
● improving your lower back stability;
● stabilizing your spine, core, and hips;
● toning your abdominal muscles for a flatter stomach;
● cinching in your waistline,
● and finally, improving your pelvic floor muscles.
How to do a stomach vacuum
- Lay on your back on a yoga mat. Bend your knees with your feet flat on the ground. Rest your arms by your slides.
- Take a deep breath in to fill your lungs. As you exhale, pull your stomach inwards. As if you’re pulling your belly button and rib cage into your spine.
- Keep breathing. Each time you exhale, pull and squeeze your stomach muscles inwards. You should feel a deep vibrating sensation in your ribcage, spine, and pelvis.
- Aim to do three reps of twenty seconds that you can incorporate into your ab routine. As the weeks pass, you can do more reps and longer intervals.
Variations: lying on your back is easier for beginners. As you become more comfortable with vacuuming, you can try standing up, on your knees, on all fours, and even sitting on a chair.
Common mistakes
● Holding your breath: there’s a big difference between sucking in your stomach from holding your breath and from squeezing your abdominal muscles. This is why it’s crucial to exhale as you initially pull in your stomach muscles. And don’t forget to breathe the entire time you’re vacuuming.
● Arching your back: be sure to keep your back flat on the ground. This will help locate the correct muscles.
● Activating the wrong muscles: avoid squeezing your glutes, thighs, or chest. To check you’re using the right muscles, place two fingers on your pelvis. It should feel tight and firm.
It can take a while to get the hang of stomach vacuuming, but that shouldn’t put you off. The most difficult part is locating the right muscles, which will take time and practice. But, once you’ve got it, you’ve got it for life! And you’ll be vacuuming like a pro — Arny will certainly be proud!
One more thing…
Whether you’re training your core for strength or to improve your athletic performance, remember to implement these bodyweight core exercises alongside a bit of cardio as well as strength training your other muscle groups. A healthy and nutritious diet also goes a long way when toning up and sculpting your stomach. For more tips on fitness and nutrition, check out Beginning.com’s library of masterclasses.